Customer and Address Attributes v27.1+
A customer attribute is a field of a customer, such as Date of Birth. An address attribute is a field of an address, such as Company. You can add your own attributes, for example a company registration number for business customers, or delivery hours for an address.
Add an attribute
- Go to System > Attributes > Customers, or to Customer Addresses for an address field.
- Click Add.
- Enter the Attribute Code and select the Input Type. You cannot change them later. An address attribute can also use Multiple Lines, with the number of lines in Lines Count.
- In Used in Forms, select the forms that show the field. Hold the Ctrl or Cmd key to select more than one form.
- In Default, select Hidden, Optional or Required.
- On the Manage Label / Options tab, enter the label, and the options of a Dropdown or a Multiple Select.
- Click Save.
A new attribute goes into the first group of the Default set. So it shows at once to every customer group that uses the default set.
The forms of a customer attribute:
| Form | Where it shows |
|---|---|
| Admin Customer | The Account Information tab of a customer in the admin |
| Admin Order Creation | The account section of a new order in the admin |
| Customer Registration | The registration page of the storefront |
| Customer Account Edit | Account Information in the customer account |
| Checkout Registration | The account section of the checkout, when the customer registers there |
The forms of an address attribute:
| Form | Where it shows |
|---|---|
| Admin Customer Address | The addresses of a customer, and the addresses of a new order, in the admin |
| Address Book and Checkout | The address book of the customer account, and the billing and shipping steps of the checkout |
| Customer Registration | The address section of the registration page, when the store asks for an address there |
The Default field applies to all the forms:
- Hidden: no form shows the field.
- Optional: the forms show the field, and the customer can leave it empty.
- Required: the forms show the field, and the customer must fill it in.
A standard field, such as Date of Birth, gets its Hidden setting from System > Configuration > Customers > Customer Configuration. So its Default field offers only Optional and Required.
Sort Order sets the place of the field in a form.
Check where a field shows
Three settings decide if a customer sees a field: the forms of the attribute, the attribute set of the customer group, and the setting of the website. The edit page of a saved attribute starts with the section Where the Field Shows, which lists the three:
- Forms: every form. A form that does not show the attribute has a line through it.
- Customer Groups: every customer group. A group whose set does not hold the attribute has a line through it. An attribute in no set shows to no group.
- Websites: the setting of each website: Hidden, Optional or Required. When all the websites use one setting, the row shows All websites and the setting.
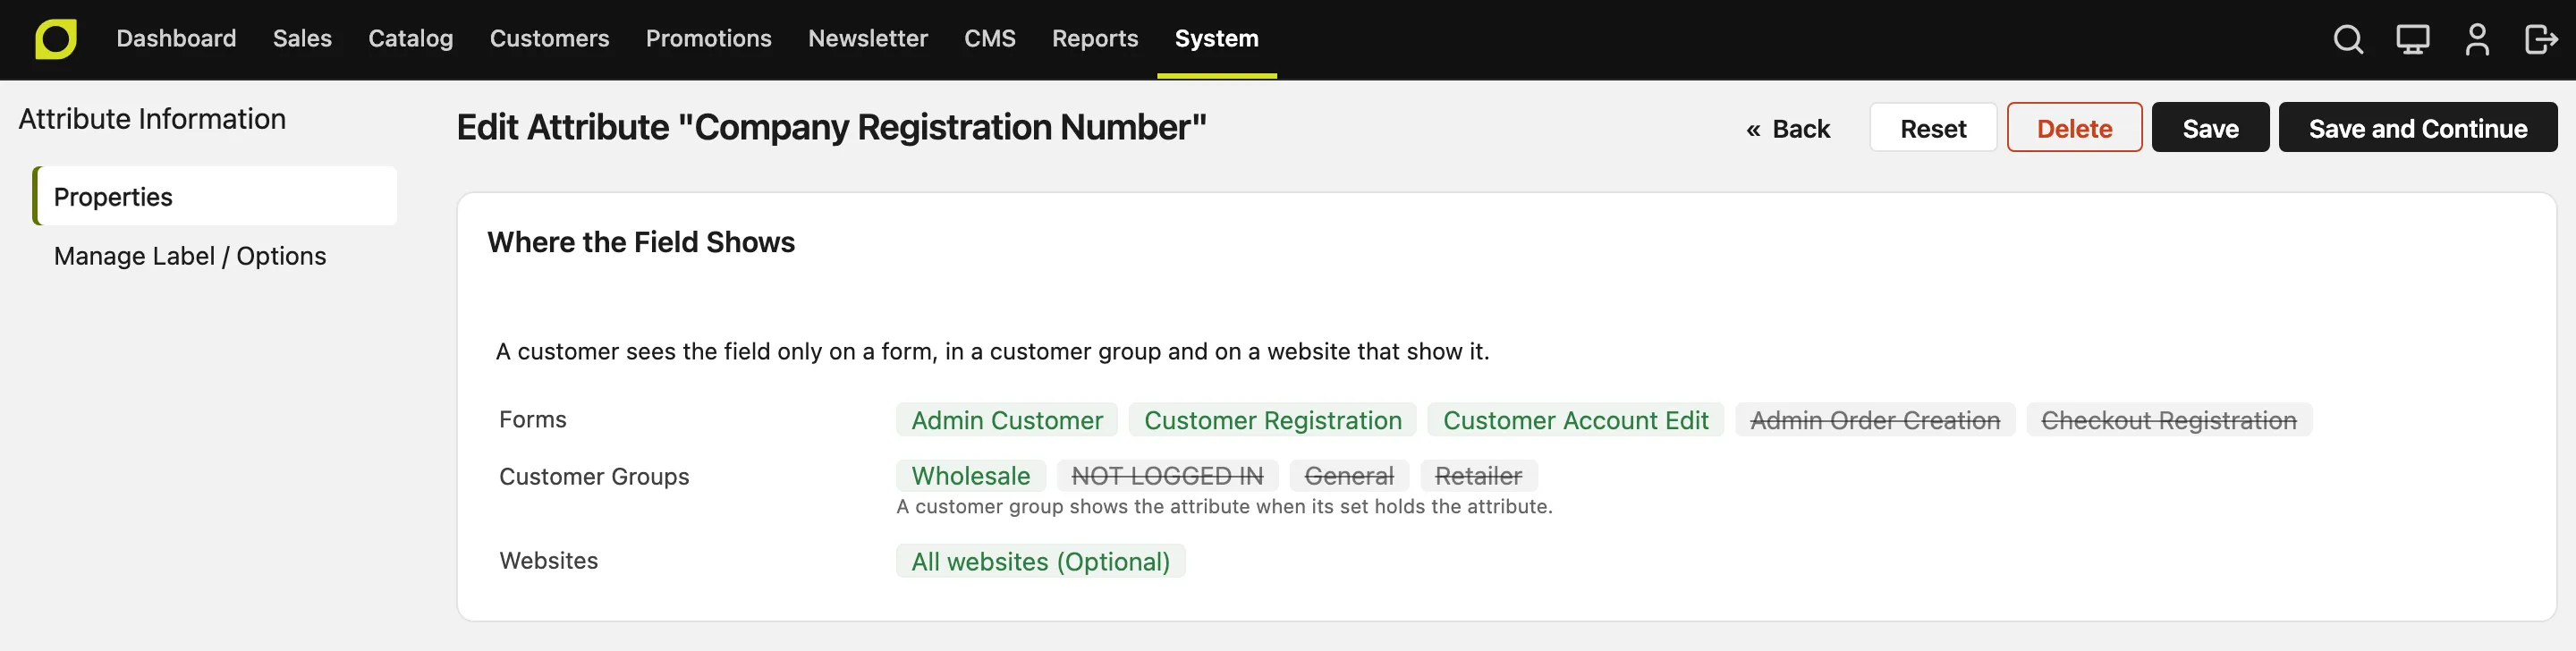
When a customer does not see a field, read this summary first.
Input rules
The values that a customer enters must follow the Input Rules of the attribute:
- Input Filter: Strip HTML Tags removes HTML from the value. Escape HTML Entities keeps the tags as text.
- Minimum Text Length and Maximum Text Length: the number of characters of a text.
- Value Format: letters, numbers, letters and numbers, an email address, or a URL.
Fields for each customer group
An attribute set is a list of attributes. Each customer group uses one customer set and one address set. A group with no set uses the default set.
For example, wholesale customers give a company registration number, and retail customers do not:
- Add the attribute, as in Add an attribute. It goes into the Default set.
- Go to System > Attributes > Customers, click Attribute Sets, and click Add.
- Enter Wholesale, select Default in Based On, and click Save. The new set holds the attribute too.
- Open the Default set. Drag the attribute to Unassigned Attributes, and click Save. The page asks first, because the retail groups stop seeing the field.
- Go to Customers > Customer Groups and open the Wholesale group.
- Select Wholesale in Customer Attribute Set, and click Save.
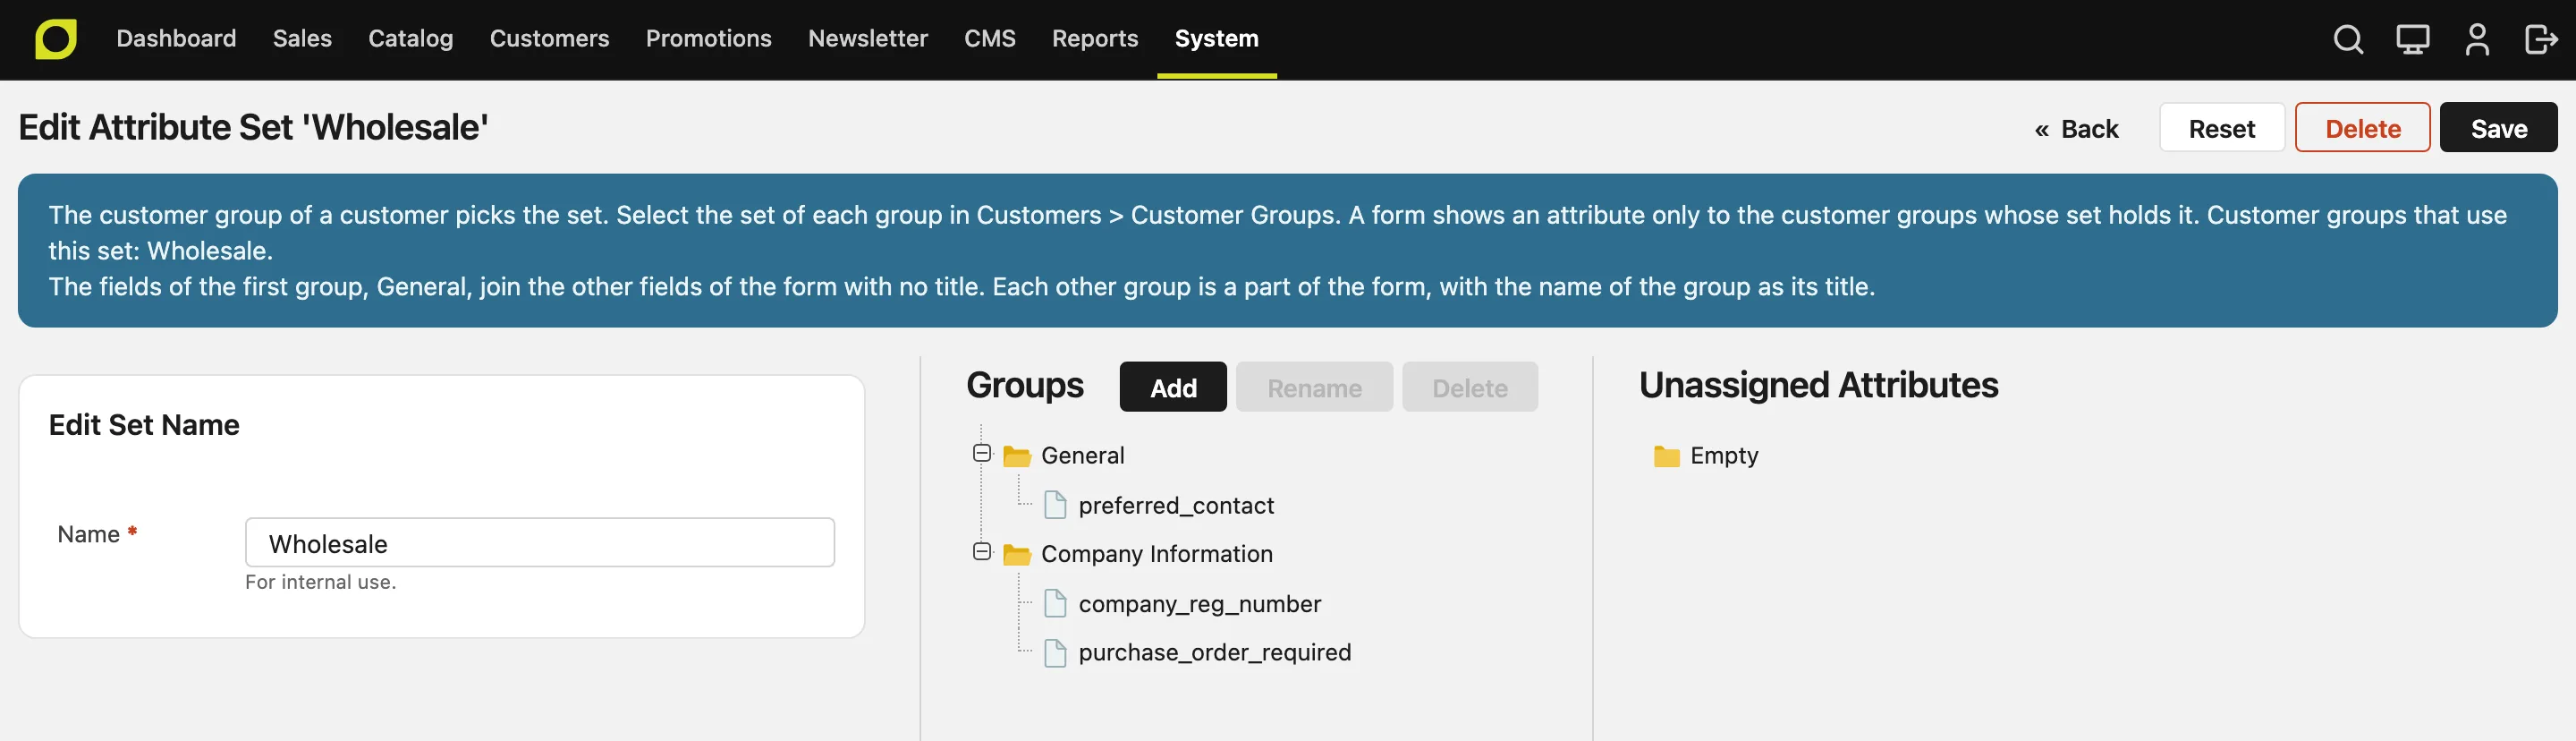
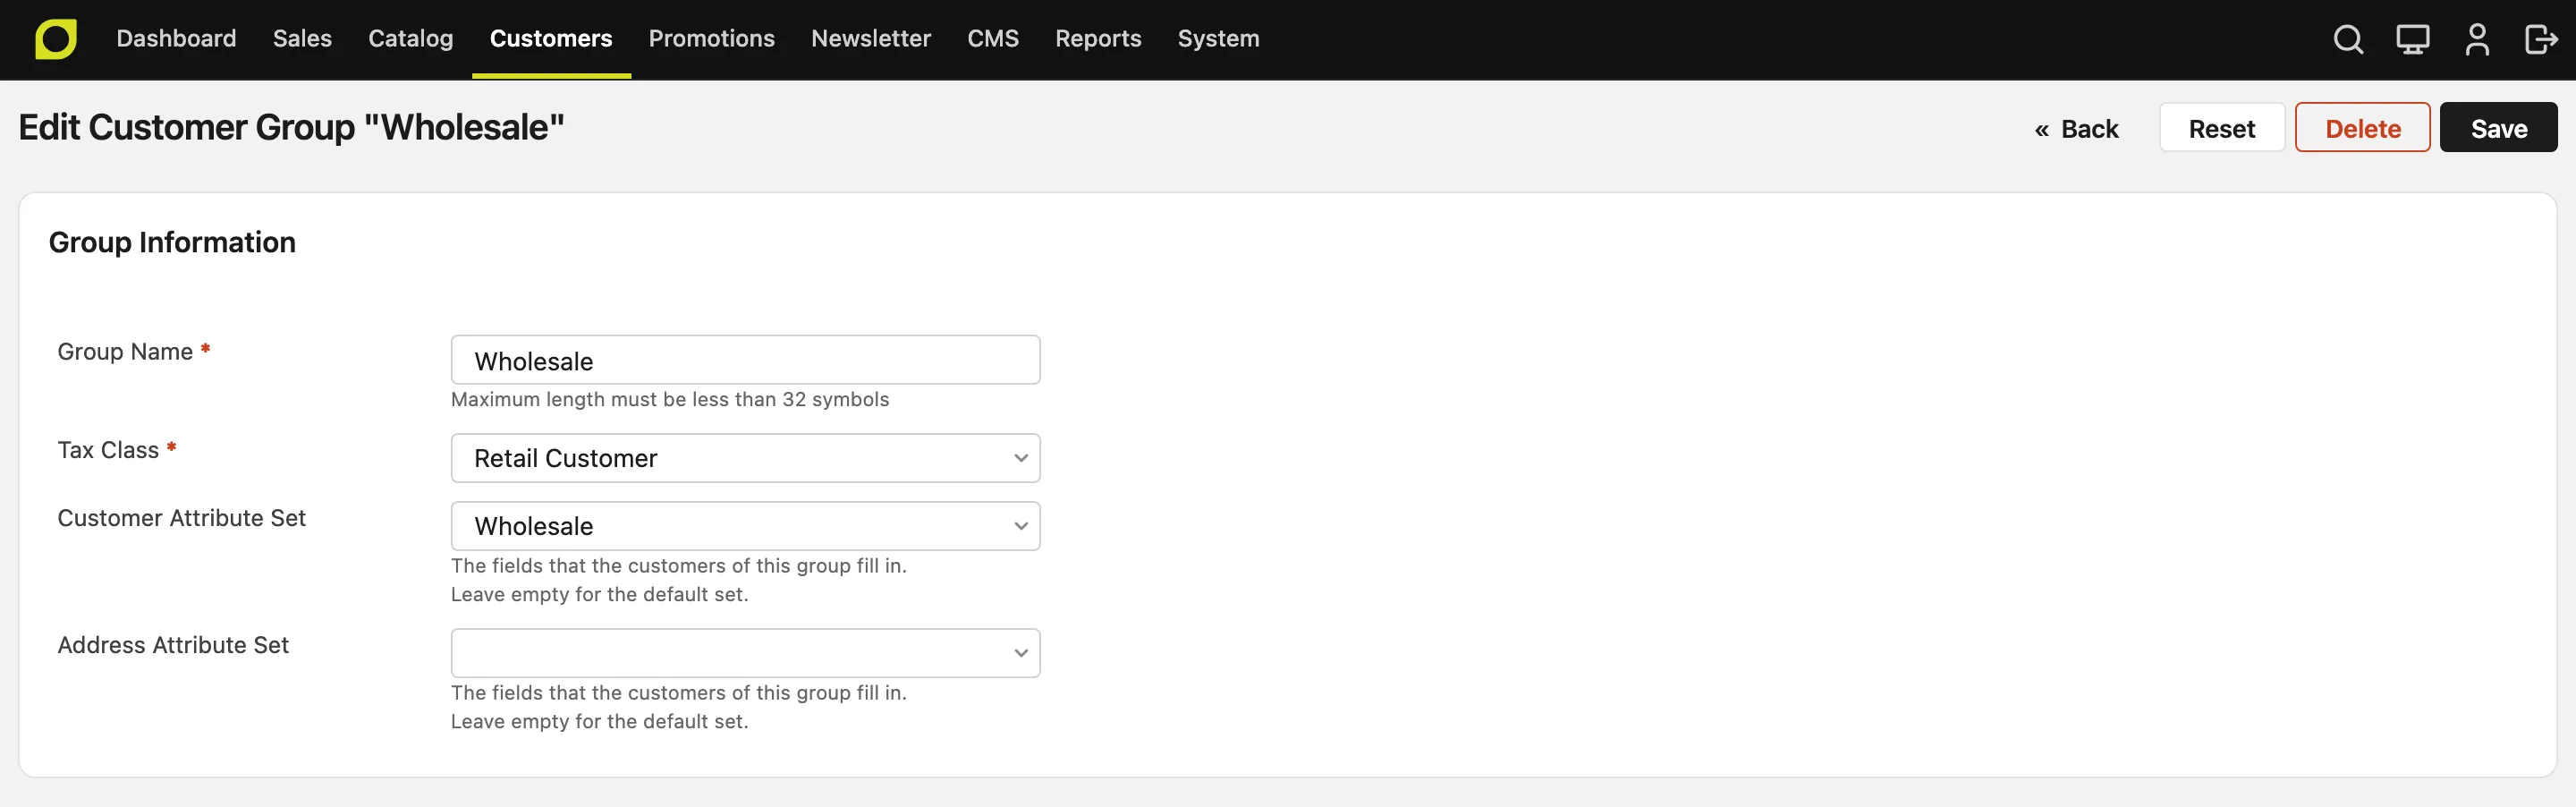
A form shows an attribute only when the set of the group holds it. An attribute in no set shows to no group. When you take an attribute out of a set, the values of the customers stay in the database, and the field shows again when you put it back.
The set page lists only the attributes that you added. The standard fields, such as First Name and Email, are in every set, and you cannot remove them.
The groups of the set split a form into sections:
- The attributes of the first group of the set show with the standard fields.
- Each other group that has a field of the form is a section with its own title, for example Company Information. The title is the name of the group, in the language of the store view. The customer page in the admin also shows each group as a section, with the Admin name.
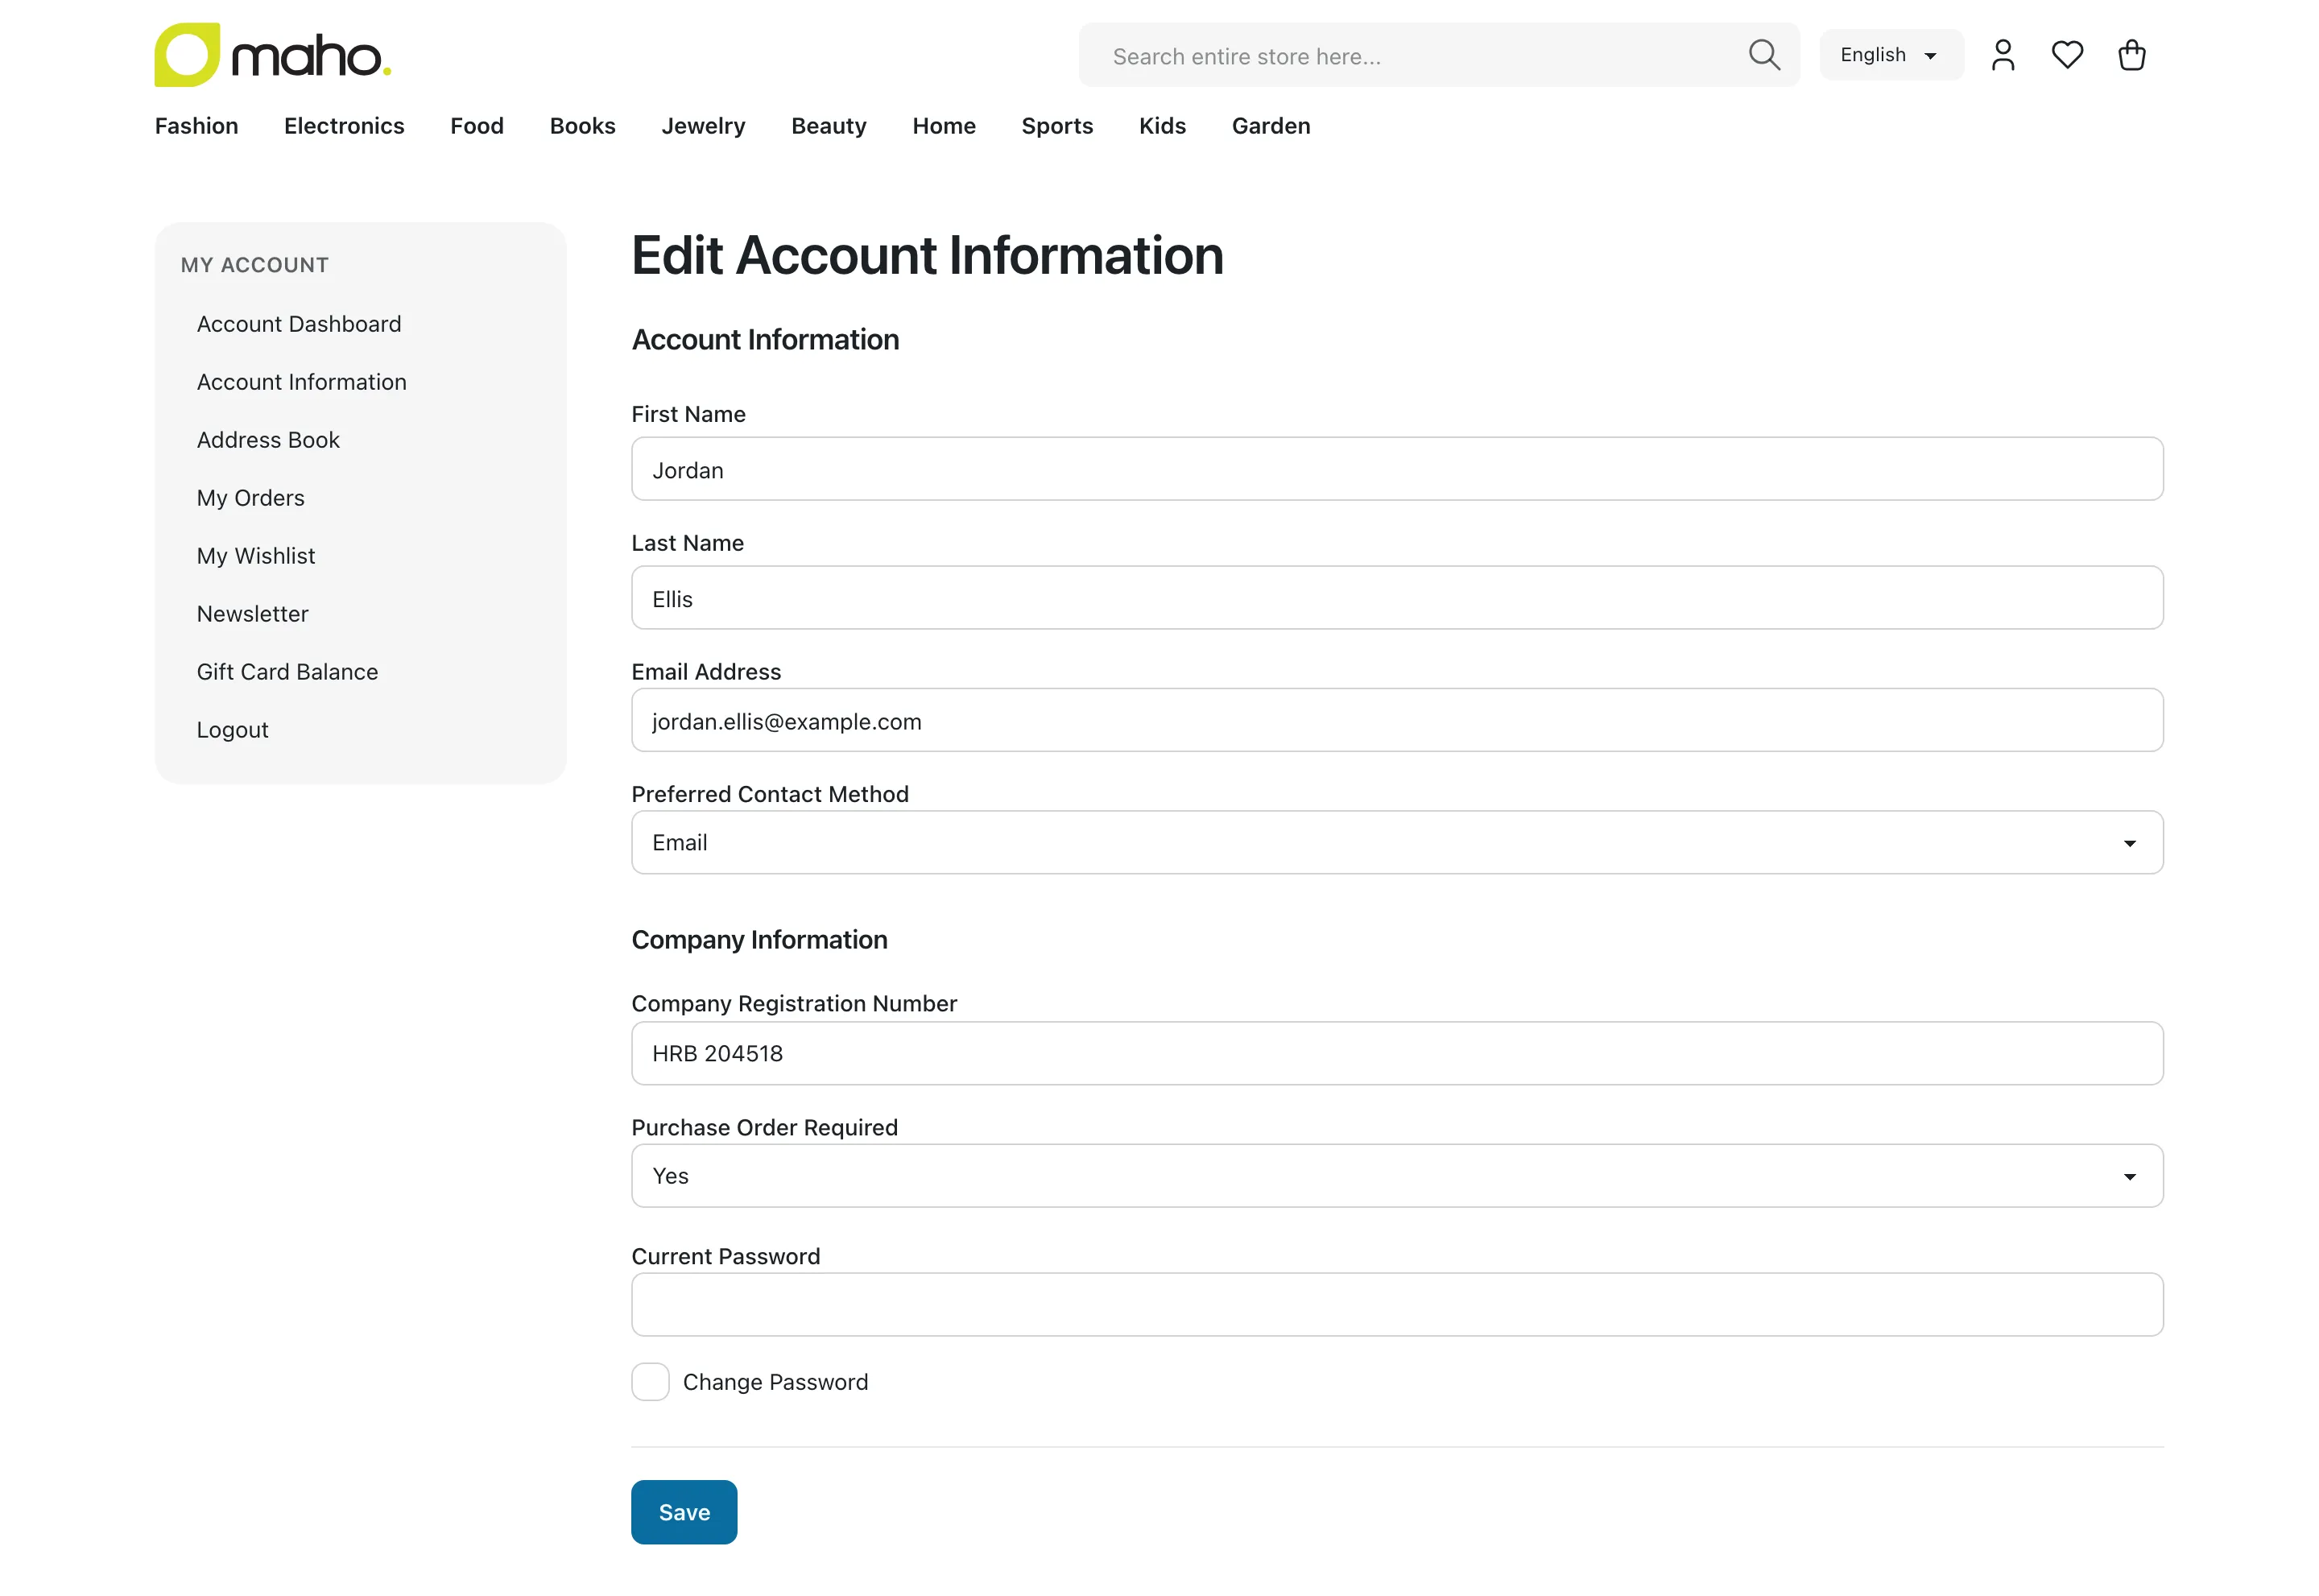
The set page shows the same note, with the name of the first group.
To pick the set of a form, the store uses the customer group in this order:
- The group of the customer.
- For an address in the checkout, the group of the cart. A guest has the NOT LOGGED IN group.
- For a customer who registers, the Default Group in System > Configuration > Customers > Customer Configuration > Create New Account Options. This setting can be different for each store view, so a business website can give its new customers a business group and its fields.
When a customer moves to another group, the values of the fields of the old set stay in the database. The customer account edit page shows the fields of the new set.
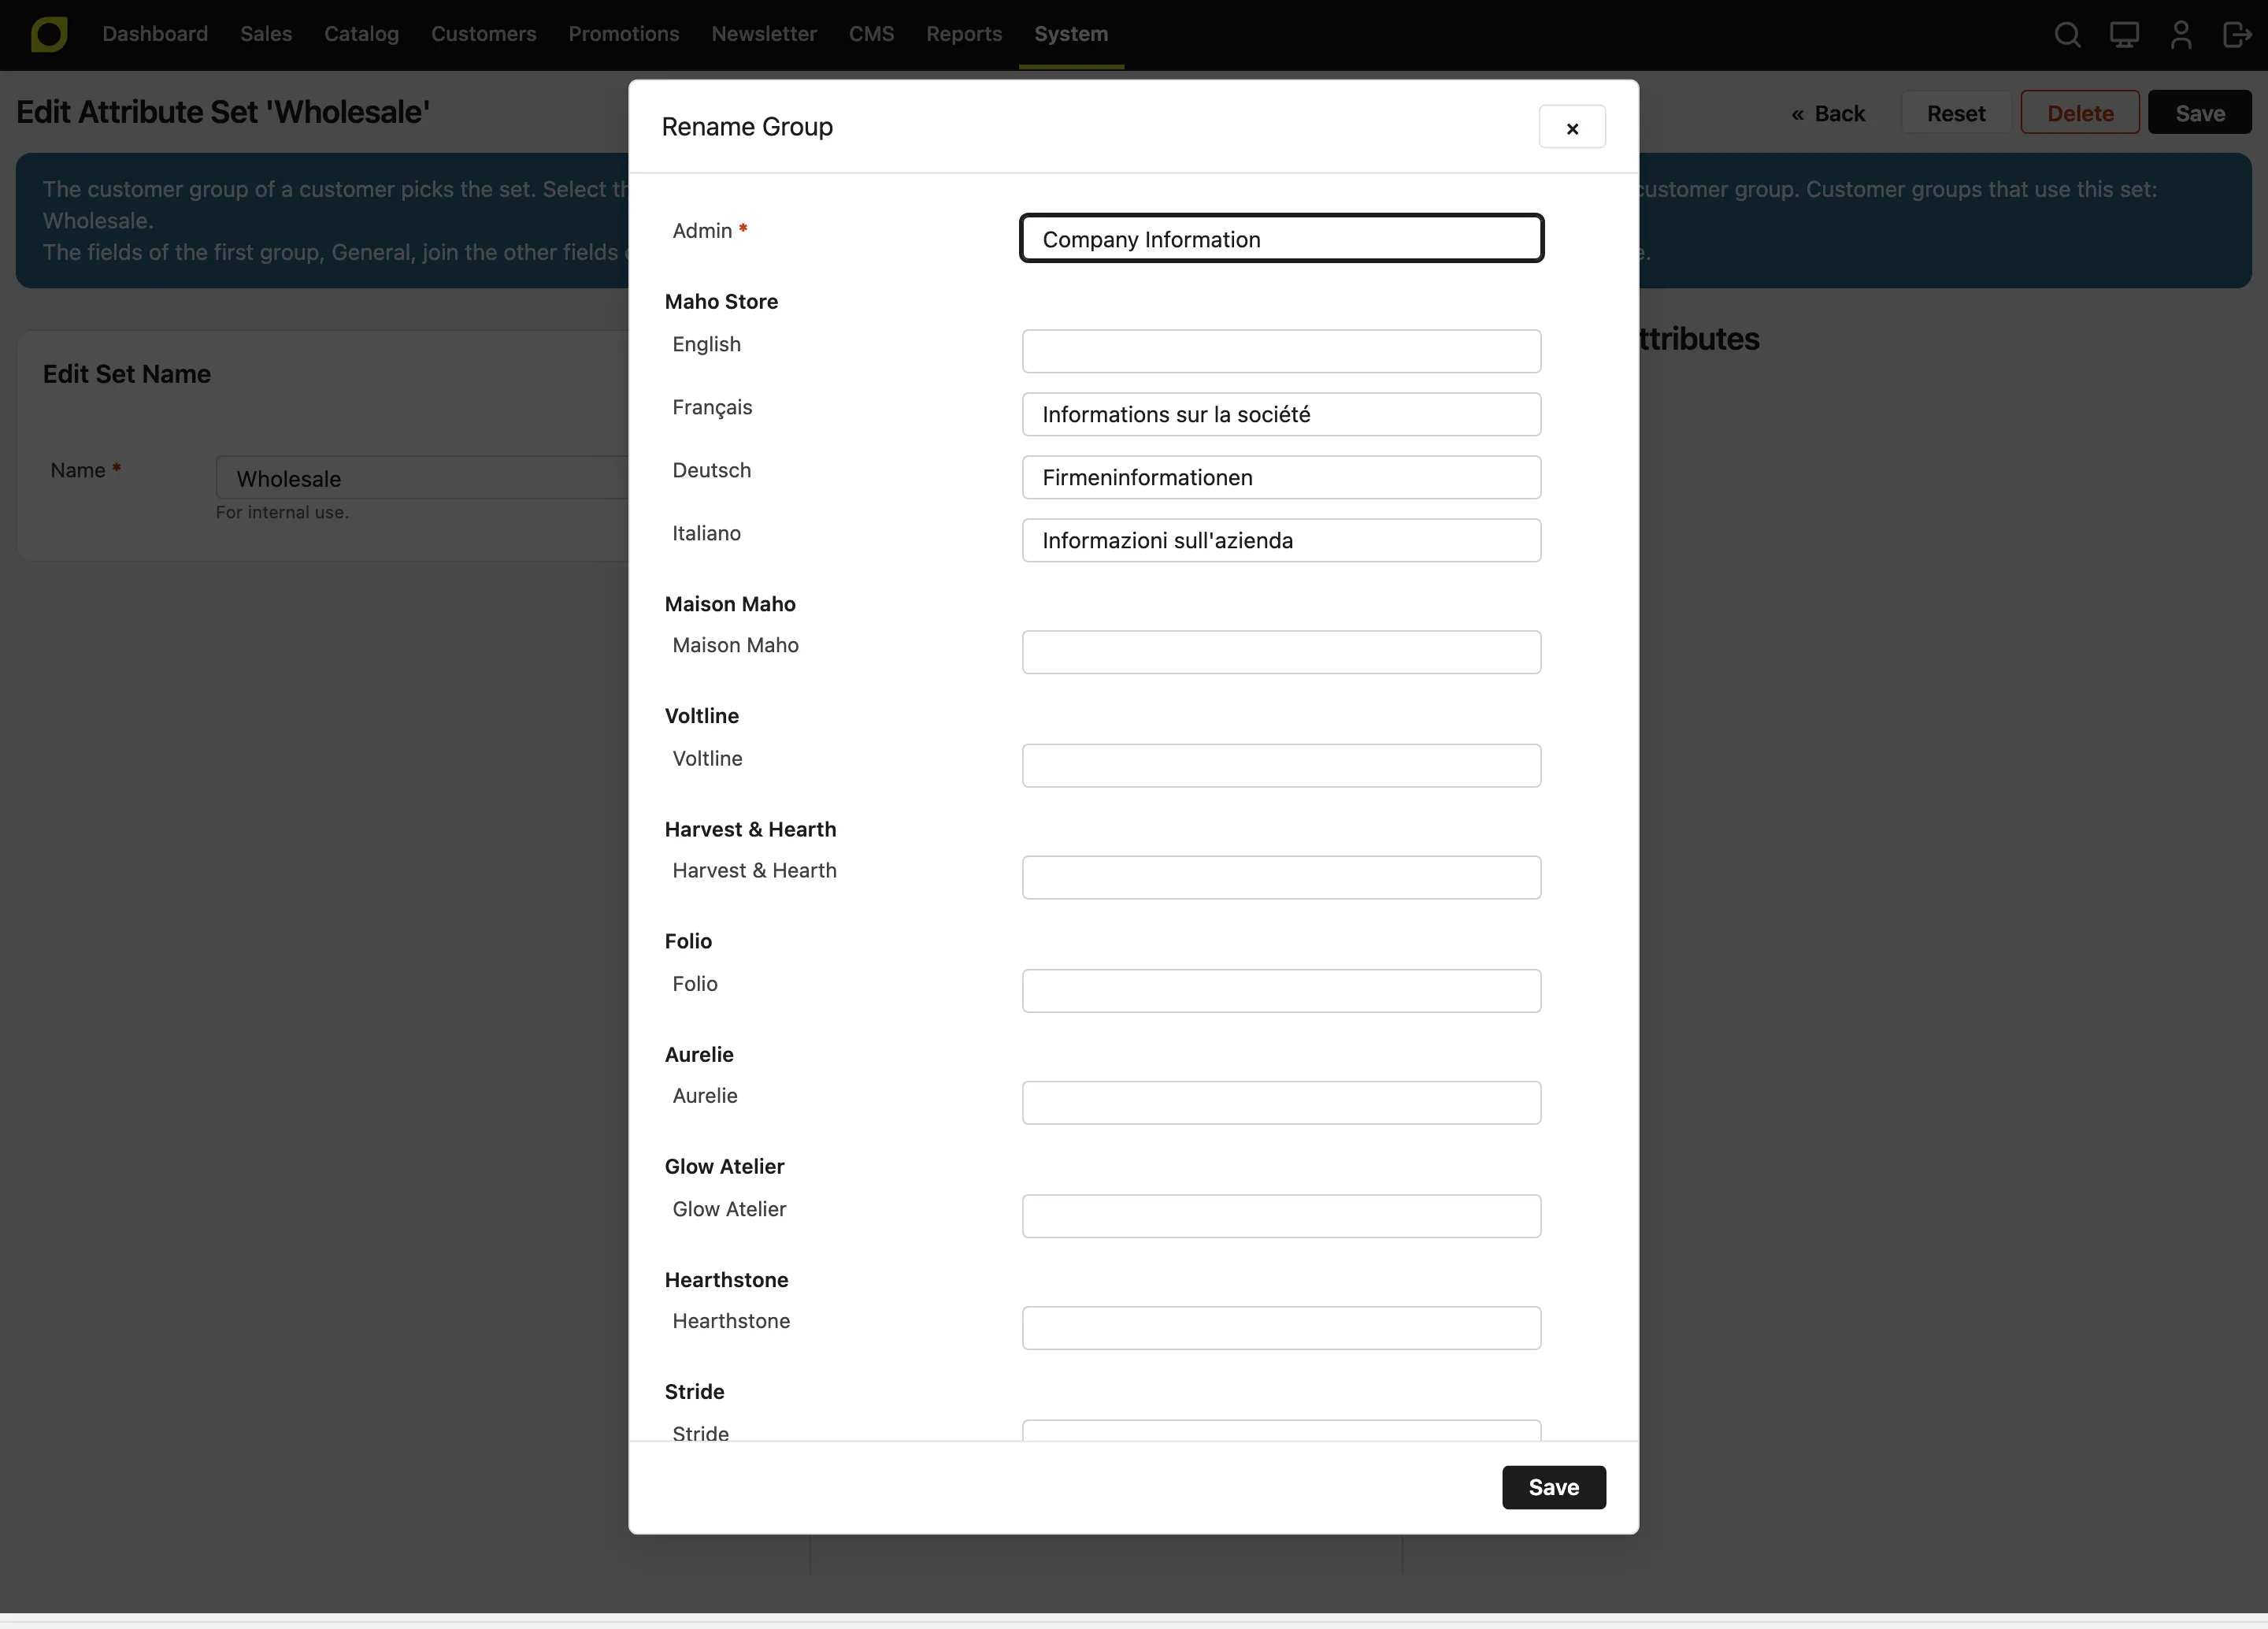
Translate the name of a group
The name of a group is the title of its section in the forms. You can give the section a different title in each language.
- On the set page, click the group, then click Rename. To make a new group, click Add.
- In Admin, enter the name that the admin shows. Two groups of one set cannot have the same name.
- In the row of each store view, enter the name in the language of that store view. If you leave a row empty, the store view shows the Admin name.
- Click Save in the window, then click Save on the set page.
Fields for each website
The Websites section of an attribute can change the default for one website:
- Hidden: the forms of the website do not show the field.
- Optional: the forms show the field, and the customer can leave it empty.
- Required: the forms show the field, and the customer must fill it in.
- Use Default: the website uses the Default field of the attribute. The option shows the result, for example Use Default (Optional).
A store with one website does not show the Websites section, because the default already decides.
Use a website setting when the field depends on the website, and an attribute set when it depends on the customer group.
Customer attributes on orders
The checkout copies the values of the customer attributes to the order, so the order keeps what was true when the customer bought, also after the customer changes the value:
- The order keeps the value, and the label of a Dropdown, a Multiple Select or a Yes/No option in the language of the store view of the order.
- A customer who registers at checkout gets the values of the Checkout Registration form.
- A reorder from the admin copies the values to the new cart.
The Account Information part of the order page in the admin shows each customer attribute that has a value. The invoice, shipment and credit memo PDFs show only the attributes that a form of the storefront shows, because the documents go to the customer.
Each customer attribute adds a column customer_ + its Attribute Code to the carts and the orders. So the code of a customer attribute cannot make the name of a field that orders already have, such as note for customer_note. When you delete a customer attribute, the orders keep its values, so a new customer attribute cannot use the code of a deleted one.
Address attributes on orders
The checkout copies the values of the address attributes to the order:
- The cart and the order keep the value that the customer selected.
- The order also keeps the label of a Dropdown, a Multiple Select or a Yes/No option, in the language of the store view of the order. So the order shows what the customer saw, also after you change or delete the option.
- A reorder from the admin copies the values back to the new cart.
Each address attribute adds a column with its Attribute Code to the order addresses. So the code of an address attribute cannot be the name of a field that orders already have, such as subtotal. When you delete an address attribute, the carts and the orders keep its values. So a new address attribute cannot use the code of a deleted one.
The order page in the admin, the order emails, the invoices and the other PDFs show each address attribute that has a value, as a line with its label, for example Delivery Hours: 9-17. An attribute that only the Admin Customer Address form shows stays out, because the emails go to the customer. To put a value in another place, add {{var attribute_code}} to the address template in System > Configuration > Customers > Customer Configuration > Address Templates. The store then does not add the line.
Customer segments
The conditions Customer Personal Information and Customer Address of a customer segment list your customer and address attributes too. For example, a segment can hold the customers whose Business Type is Wholesaler.
The API
The REST, GraphQL and MCP APIs read and write the values in customAttributes, by attribute code. An order returns the customer values in customerCustomAttributes, and their labels in customerCustomAttributeLabels. A Dropdown is an option ID, a Multiple Select a list of option IDs, and a Yes/No true or false. A write follows the Input Rules of the attribute. The order addresses return the option IDs too, and customAttributeLabels returns the labels that the customer saw.
An admin token or an API token reads and writes the attributes of the Admin Customer and the Admin Customer Address forms. GET /api/rest/v2/custom-attributes?entityType=customer and ?entityType=customer_address list the attributes, their options and their attribute sets.
A customer token, and a guest who registers or checks out, reads and writes only the attributes that the storefront forms show to the customer group on the website, as on the storefront:
- A registration takes the attributes of Customer Registration, and must send each required one.
- An update of the customer takes the attributes of Customer Account Edit.
- An address of the address book and an address of the cart take the attributes of Address Book and Checkout. A new address of the address book must send each required one.
- A cart address, set with the address endpoints of the cart or in the body of the place-order request, must send each required one, because the checkout sets the whole address at once. On the cart,
sameAsShippingcopies the values of the shipping address to the billing address. The order copies the values from the cart. - A guest order takes the attributes of Checkout Registration in
customerCustomAttributesof the place-order body, and must send each required one, as the storefront checkout does. A customer order takes the values of the customer account, so its body must not sendcustomerCustomAttributes.
GET /api/rest/v2/customer-forms/{form} and the GraphQL customerForm query list the fields of a storefront form for the customer group of the caller: the label in the store view, the input type, the options, the required flag and the group title. The form is customer_account_create, customer_account_edit, checkout_register, customer_address_edit or customer_register_address.